
GuideApp tutorials
Class 11: how to make folders and add products
Class 11 of the Wasoolo course: group your shelf into folders, put a folder inside a folder, and add a product with its rate, unit, code and barcode.
What Class 11 covers, in order
- 1Open the Stock tabFolders on top, loose products under them, and what the shelf is worth.
- 2Make a folderA name, an icon and a colour, so the group is found by eye and not by reading.
- 3Go inside and make anotherThe + Folder button inside a folder builds the new one inside it.
- 4Add the productPhoto, name, buy and sale rate, unit, description, item code and barcode.
- 5Move what is in the wrong placeLong-press any product or folder and move it where it belongs.
Two hundred items in one long list is a list nobody scrolls. Wasoolo's Stock tab lets you group them the way your shelves are already grouped: folders on top, loose items under them, and a folder inside a folder when a group gets big. Class 11 builds both from empty.
What is on the Stock tab
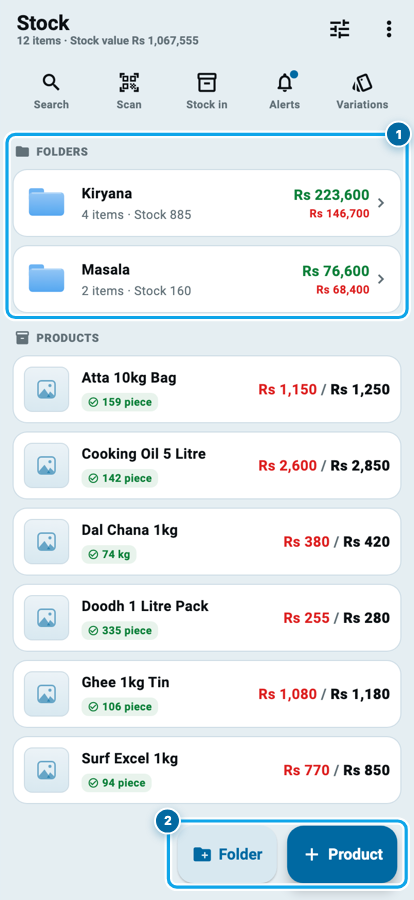
Open Stock from the footer. The title bar counts your whole shelf: how many items, and what the stock is worth.
Under it, a row of five doors: Search, Scan, Stock in, Alerts and Variations. Then FOLDERS, then PRODUCTS, in that order, so groups always sit above loose goods.
A folder's row carries its name, how many items are in it, the pieces on the shelf, and two figures: what the goods would sell for in green, and what they cost you in red. A product's row carries its name, the stock it has, and the same pair of rates.
At the bottom right sit the two buttons this whole class runs on: Folder and Product. They stay on screen at every depth, so a new group or a new item is always one tap away.
What Class 11 covers, in order
- 1Open the Stock tabFolders on top, loose products under them, and what the shelf is worth.
- 2Make a folderA name, an icon and a colour, so the group is found by eye and not by reading.
- 3Go inside and make anotherThe + Folder button inside a folder builds the new one inside it.
- 4Add the productPhoto, name, buy and sale rate, unit, description, item code and barcode.
- 5Move what is in the wrong placeLong-press any product or folder and move it where it belongs.
Make a folder
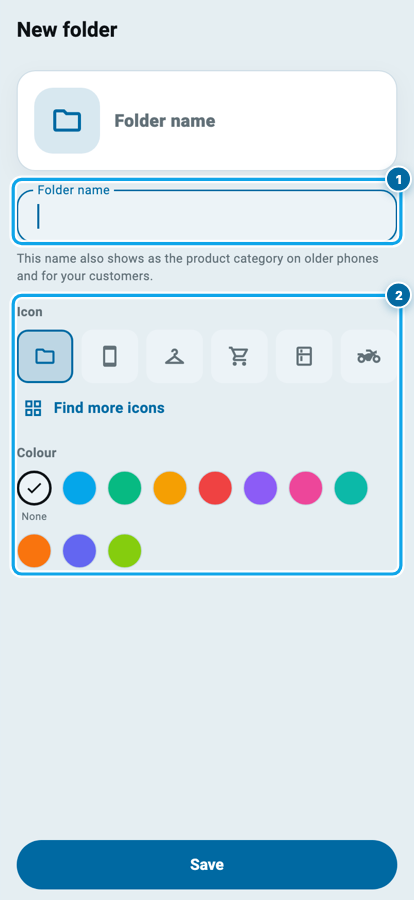
Tap Folder. The form is short on purpose.
Folder name is the only thing it needs. Type what your shelf is actually called: Kiryana, Masala, Mobile Covers, Rice. The line below tells you the truth about that word: the same name also shows as the product category on older phones and to your customers, so write it for them too, not in shorthand.
Then Icon and Colour. Six common icons sit ready, and Find more icons opens a searchable set grouped by trade: mobile and electronics, clothes and shoes, grocery and food, home and kitchen, beauty and health, auto and hardware, toys and books. Ten colours sit under it, plus None.
This part looks decorative and is not. A shopkeeper standing at his counter with a customer waiting finds a blue basket faster than he reads the word "Kiryana", and that is the whole reason the row exists.
What a folder's own line adds up
Both figures print on the folder's own row, so you can see which group is holding your cash without opening anything.
A folder inside a folder
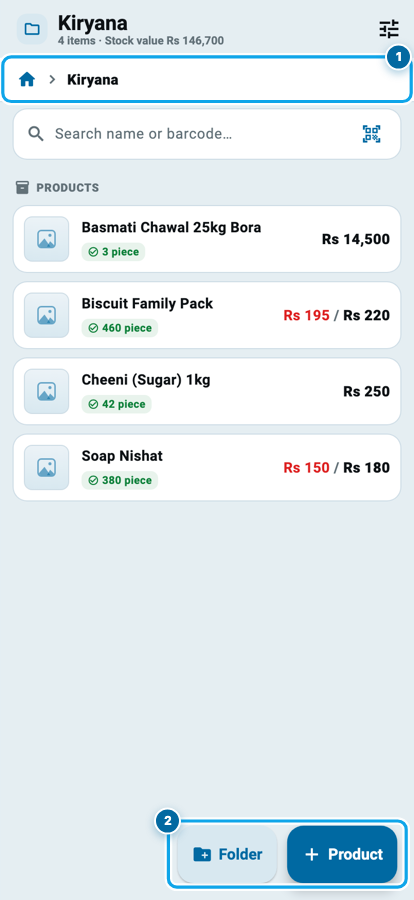
Open a folder and it becomes its own little shop: a breadcrumb at the top showing where you are, a search box for the goods inside it, and the same Folder and Product buttons at the bottom.
That is how a folder goes inside a folder. You never type where a new folder lives; you stand in the place you want it and press Folder. A group called Mobile Covers inside Electronics is made by opening Electronics first.
One rule to know before you plan a deep tree: a folder can go one level deep, and no further. It is enough for a real shop and it stops the list turning into a maze you have to dig through with a customer waiting.
Start your digital khata today
Free to start. Works offline. English, Roman Urdu & Hinglish. Your customers get their app free, forever.
Add a product
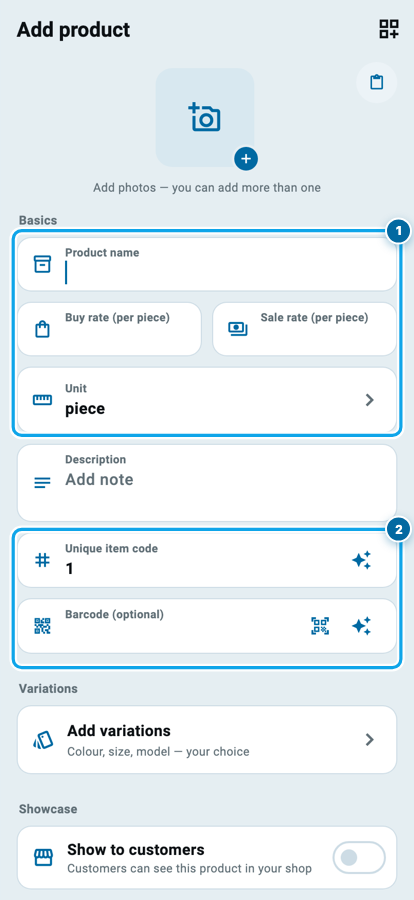
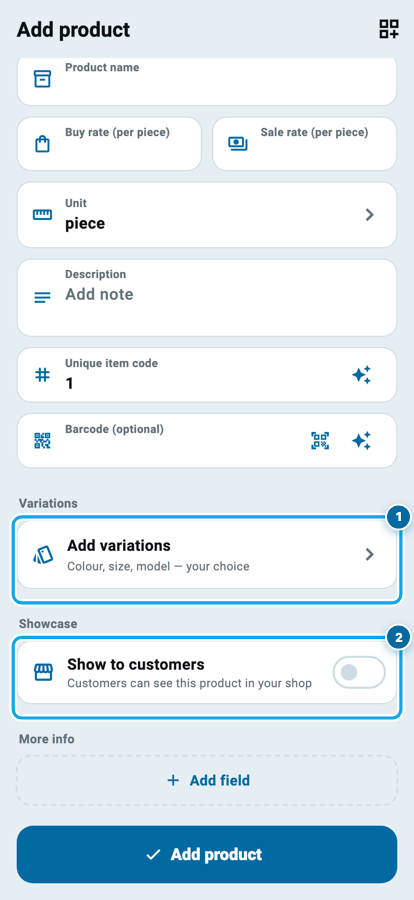
Tap Product. The top of the form is a photo tile, and you can add more than one, so a customer-facing item can carry the picture that sells it.
Product name is required. Under it, Buy rate and Sale rate sit side by side, half a row each, both marked per piece or per whatever unit you choose. The buy rate is what you normally pay for it, and it is what your profit is worked out from later, so it is worth filling in even on the first day. Unit opens the list of piece, kg, litre, metre and dozen, and everything after that reads "per" whichever word you picked.
Description is a free note about the item, and it prints on the paper your customer sees.
The code, the barcode and the variations
Unique item code fills itself in with the next number, and the small sparkle beside it makes one for you if you would rather have a coded name than a plain count. It is what you type at the counter when you know the item but not the spelling.
Barcode (optional) has two buttons: scan the code that is already printed on the packet, or generate one for goods that came without any. Once it is saved, scanning at the till finds the item instantly.
Add variations is for one product that comes in several forms: colour, size, model. Stage them here and the same list is waiting for you when the goods arrive on a stock-in bill, so a shirt in Black and White is one product with two lines and not two products with confusing names. It is the honest answer to a shelf where two rates or two forms of one item keep getting written twice.
Show to customers is the last switch, and it decides whether the item appears in your customer-facing showcase. Add product saves it.
Put things where they belong
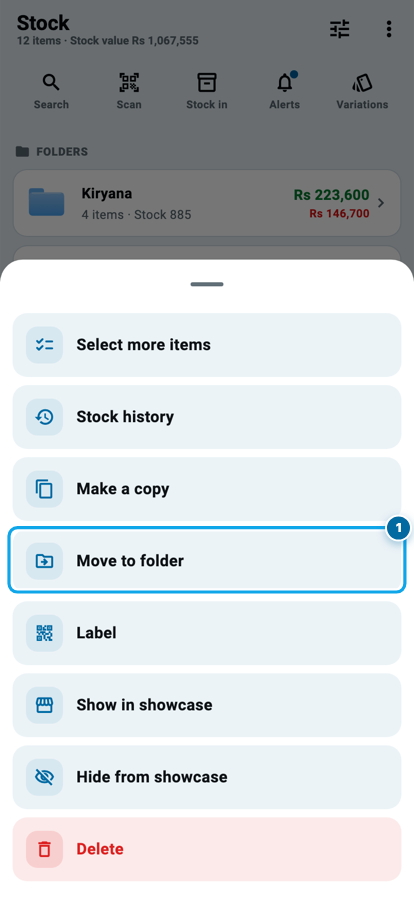
Long-press any product and a menu opens with Move to folder in it. Pick the folder and the item lands there; nothing about the product changes except where it is filed. Select more items at the top of that same menu moves a whole batch at once.
A folder itself long-presses the same way: rename it, change its icon and colour, move it inside another folder, print labels for everything in it, or delete it. Deleting a folder does not delete the goods. The products simply come back out of it and sit loose, which is exactly what a shopkeeper expects and exactly what most apps get wrong.
Where the stock number comes from
One thing the add-product form deliberately does not ask is how many you have.
That is not an oversight. A quantity is a fact about a purchase, not about the product: the goods came on a day, from a supplier, at a price. So the count is written where that happens, on the stock-in bill, which is exactly what the next class in this course is about. Add the item today, receive the goods tomorrow, and the shelf number appears on its own, without a second stock register to keep in step.
Common questions
Do I have to use folders at all?
No. A product with no folder sits loose in the PRODUCTS section and works exactly the same. Folders start earning their keep somewhere past thirty or forty items.
Can one product sit in two folders?
No. An item lives in one place, the way it does on a real shelf. If you need it findable two ways, the search box and the item code are the two ways.
What happens to the products if I delete a folder?
They stay. They only come out of the folder and sit loose, so nothing is ever lost by tidying up.
What is the difference between the item code and the barcode?
The item code is yours, and Wasoolo numbers it for you. The barcode is the one printed on the packet, or one you generate for goods that have none. Either one finds the item.
Can my helper add products?
Only with the permission for it. Adding, editing and seeing the buying rate are separate keys, so a salesman can be allowed to add an item without ever seeing what you paid for it.
I typed the buy rate. Does that mean I bought it?
No. That box is what the item normally costs you, and it is what profit is worked out from. Money owed to a supplier is only recorded when you write a stock-in bill.